Posted on

Choose Forged Aluminum Wheels Many Benefits

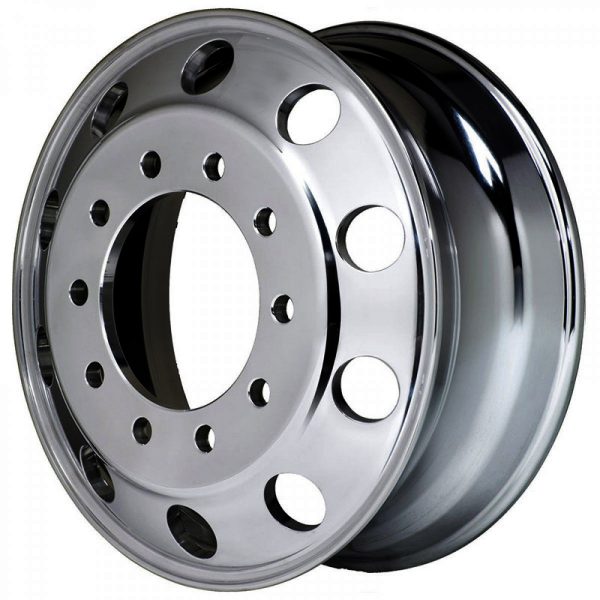
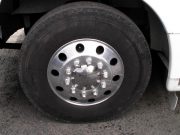
In today’s world of higher fuel prices, anything you can do to reduce fuel consumption in your truck, bus or commercial vehicle adds to the bottom line and makes your hard earned dollar go further.Sturdy, stylish aluminum trailer wheel is lightweight, provides superior corrosion protection and meets Department of Transportation standards.One such way is to replace your heavy steel wheels with lighter, tougher, forged aluminum wheels by Global Aluminum Wheels.
Global Aluminum Wheels is a premier supplier of light and industrial grade aluminum wheels for trucks, trailers, high-end tour buses, commercial vehicles, and specialty vehicles. The liquid forged aluminum wheels offer better cooling, longer-lasting service life, and better stability, comfort and maneuverability then steel wheels.

8-25x22-5-demountable

Installation of Global forged 22.5 inch aluminum wheels reduces vehicle weight substantially resulting in better fuel savings and extra payload capability. It also improves vehicle acceleration performance and lessens the energy needed for braking systems by reducing rotational momentum of the wheels.

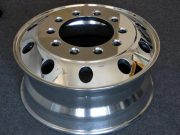
The Hub-piloted mounting design helps to eliminate bolt hole chamber wear, offers greater clamping force and a reduction in nut wear.

Other benefits include:

  • Reduced Tire Wear By 26% – Forged aluminum alloy wheels dispel heat quicker then steel wheels.
    Lower temperatures also better protects suspension system which helps reduce wear and tear on tires, which extends usable life of a tire.
  • Reduced Brake Maintenance Cost – Forged aluminum wheels dispel heat quickly and keep wheel temperatures low, maintaining optimal operating temperatures for the braking system. This leads to the extended lifespan of brake parts and reduces the overall maintenance cost of the brake system.
  • Extraordinary Load Carrying Capacity – Forged aluminum wheel’s load bearing capacity is 5 times greater than that of an ordinary steel hub.
  • Improved Driver’s Comfort Level – Wheels forged from lightweight aluminum alloy create a nimble yet stable road performance and an overall better driving experience.
  • Superior Impact Resistance Capability – Tests prove that upon identical impact, the damage to a forged aluminum alloy wheel is much less than that of a steel hub.
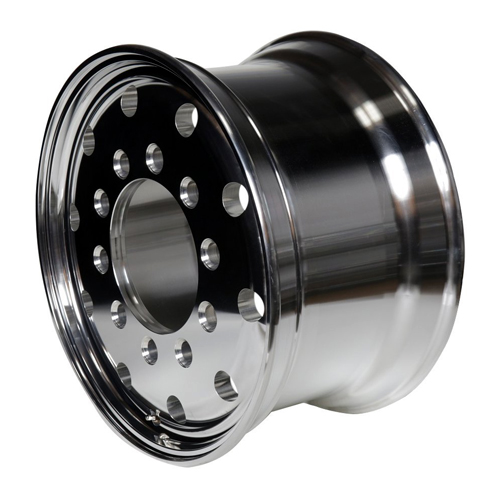
  • Durable, corrosion-resistant aluminum construction
  • Hi-Spec series 03 design is unique and appealing
  • Front and back of wheel are clear coated
  • Improved clamp force (ICF) technology helps to keep wheel securely in place
  • Bulletproof joint created between wheel and hub when properly installed
  • No need to retorque after initial installation
  • Attractive modular pattern
  • High-quality wheel meets DOT specifications

Available in both machined and mirror polished finishes and popular 22.5″ X 8.25″ , 24.5″ X 8.25″, 22.5″ X 9″ and 22.5″ X 14″ wheel sizes, you not only save fuel, you get a great looking wheel.

So upgrade your fleet with stronger, lighter aluminum wheels from Global and start putting more money in your pocket instead of your tank. Order online at NewTruckSpring.com or send mail:info@tinmyautoparts.com for more information.

Popular 22.5 Aluminum Wheels:


1. 22.5″ x 8.25″ Aluminum Trailer Wheel

2. 22.5″ x 9″ Aluminum Trailer Wheel

3. 24.5″ x 8.25″ Aluminum Trailer Wheel


4. 22.5″ x 14″ Rim 10 Lug Aluminum Trailer Wheel

Posted on

how to measure trailer leaf springs replacement ?

Step 1: Determine Type of Trailer Spring

Determine the type of trailer spring. What do the ends of your trailer spring look like? Below are images of the most common types of utility trailer springs Determine if you have a double eye spring or a slipper spring with a flat, radius, open eye, or hook end.


Step 2: Measure Width of Spring

Measure the width of the spring. The majority of trailer springs for boat, motorcycle, horse, camping, flatbed, and utility trailers are 1-3/4 inches wide.  To determine the width, simply measure along the center of the top leaf.

Step 3: Measure Length of Spring

Measure the length of the spring. If you are replacing a spring, getting the same length is important. To measure the free length, refer to letter “C” above. It is important that your trailer is unloaded when measuring the length. When determining length (C), measure from the center of one spring eye to the center of the other spring eye for double eye springs. Measurements will vary depending on the age and fatigue of your spring. We offer a large selection of trailer springs. Determining the length first will narrow your selection down considerably and make finding the correct spring quicker.

Step 4: Determine Capacity

Determine the capacity and how many leafs. Determine what type of capacity you require and how many steel leaves your existing springs have. If you are replacing all of your springs, the number of leafs will not be as important. You can switch from a 4 leaf to a 3 leaf with thicker steel if you prefer. The capacity ratings are per spring. Determine the rating of your trailer axle and then select the capacity of your springs. If you have a 6000 lb. rated trailer axle with two springs, use two 3000 lb. rated or higher trailer springs.

Step 5: Measure Free Open and Arc of the Spring

Measure the free open (H) and the arc (A) and (B) of the trailer spring. These measurements are more for reference and will change with the age and fatigue of your spring. These measurements can show you the importance of replacing all of your springs rather than one at a time. If you have an older spring that has lost its arc over time and you add one new spring with a taller arc to the other side of your trailer, your trailer will lean to one side causing for an uneven load and unsafe conditions.

Leaf Spring Bushings

The majority of springs are shipped with 9/16″ trailer spring bushings. Please place a comment on your order during checkout if you would like 1/2″ bushings. Not all springs can use 1/2 inch bushings, it they cannot and you request them, we will let you know before shipping.

Trailer Spring Capacity

The capacity rating is per spring. If you have a 6000 lb. rated trailer axle with two springs, use two 3000 lb. rated springs.

Change Springs in Pairs

All springs are sold individually, but it is highly recommended to change them in pairs. Changing only one spring may cause your trailer to lean to one side due to the spring fatigue of the unchanged spring(s).

Posted on

When To Replace Or Change Leaf Springs?

leaf-yes-no-maybe

Q: How do I know if my leaf springs are worn out?

A: The signs and symptoms of a worn leaf spring may be severe and quite obvious, however they can also be hard to detect if the symptoms aren’t very apparent and you don’t know what to look for.

Should I replace my leaf springs? It’s hard to always know when the right time is. Some of the more obvious symptoms are a cracked leaf or the rear of the truck in a constant sagging position (lower in rear). But some less apparent indications can actually be a leveled truck that has not had a leveling kit installed. Really? A level truck can mean a worn leaf spring? Yes, because most pickup trucks are actually slightly raised about 1.5 – 2.5 inches in the rear which gives a “nose down” affect. The reason manufacturers set the vehicle this way is to accommodate for weight or load on the rear of the truck so your lights are not pointing at the sky and blinding on-coming traffic. So if your vehicles level, that may indicate your springs are not sitting at the height they were intended to due to fatigue and wear.

So what if I just used an add a leaf kit or installed a helper spring like a Firestone air bag, Hellwig helper spring or Timbren kit? It may or may not help your situation and it is not recommended because it will essentially just be masking the problem. Adding a leaf will work… temporarily. Eventually, in the near future, that single leaf will most likely lose its strength as the other s aren’t going be helping out too much. A leaf pack is intended to work together, so that’s just a quick fix, not a solution.

As for helper springs; they are a great addition – but only after you replace the leaf spring! A helper spring is intended to do just as the name states, help a spring, but a healthy spring. You must have a good leaf spring because the vehicle is not designed to rely on helper springs which are not designed to be the “primary” suspension of the vehicle.

Helper Springs
If the back of truck is only sagging when hauling or using something like a turnover ball hitch, then yes – a helper spring is your best option. Even after you replace your leaf springs, if you’re constantly adding weight, then go with the helper spring. OEM leaf springs are designed to be in the middle of weight support and comfort. If the leaf springs are too stiff, then you’re going to bounce all over the cab and have a back ache after you drive to your local supermarket. If their too soft, you won’t even be able to put a slab of sheet rock in the back. So they often choose the middle of the two. A helper spring however gives you the option of the two, without constant compromise. Most helpers springs (and this does not include an “add-a-leaf”) are progressive rate springs, meaning the more force on them the more force they exert back. This gives you a good ride when unloaded and weight support when needed.

Posted on

2” and 3 1/2” king pins design and features

The king pin is a component of the coupling between the semi-trailer and the tractor unit.

Different designs make it possible to install king pins onto a trailer quite easily. JOST king pins satisfy the most stringent safety requirements. They are produced from high-quality, coated, forged blanks which are tested for the complete absence of cracks. Exchanging or converting our king pins is both quick and easy.

The king pins can be replaced or converted quickly and easily.

National regulations (in Germany §§19, 20, 21 of the “StVZO” Motor Vehicle Safety Standards) and JOST mounting and operating instructions must be observed for the installation, conversion and replacement of king pins.

For safety reasons, we recommend only using the screws once.

jost-king-pin-designsJOST king pin designs

Pins for retention plates with cone-shaped locating hole (flange).

Pins for dish-shaped retention plates (plate).
The pin is bolted to the retention plate and is easy to replace from underneath. 2” and 3 1/2” pins can be interchanged onsome types.

Pins without a retention plate. The pin is bolted to the top plate.

All the designs satisfy the requirements of the currently valid standards:

2” king pins (ø D = 2” ): dimensions as per Directive 94/20/EC – Class H50, DIN 74080 and ISO 337. 3 ½“ king pins (ø D = 3 ½“): dimensions as per DIN 74083, ISO 4086 and 94/20/EG.

The retention plate is welded to the skid plate. The relevant permitted load (D value) depends on the type of king pin and the skid plate thickness (A) in use and its bracing. Therefore, JOST installation instructions must be complied with. (Please also see our instructions for mounting and operation.)

Marking

The respective type designation is stamped into the pin and the retention plate. The type designation must match on both components. If several type designations are stamped into the retention plate, the pin may be changed for the typedesignation stamped into the retention plate. Example:switching from 2” to 3 1/2” pins. Legal regulations must be observed.

 d9f4a4c9e1 2b046d522a

Product overview

2” king pins for use with 2” fifth wheel couplings as per directive ECE R55-01 as well as DIN 74081 and ISO 3842.

3 ½“ king pins for use with 3 ½“ fifth wheel couplings as per directive ECE R55-01 as well as DIN 74084 and ISO 3842.

All king pins are suitable for use in self-steering axle systems.

9e25e624e7

Posted on

Timbren SES Kit Or Air Bags,Which is better?

What is an Air Bag Helper Spring?firestone-air-bag
An Air Bag Helper Spring will install either inside your coil for coil sprung vehicles, or on the leaf or axle for leaf sprung vehicles. Once installed they can be inflated to provide up to 5000lbs of load leveling capacity, based on the type of air bag designed for your specific vehicle. You will need to maintain 5psi at all times, so the integrity of the bag is not compromised. As a general rule of thumb for 5000lb kits each additional pound of pressure is equivalent to 50 pounds of added support. Once inflated to the proper level air bags will keep your bed level with the front, reduce sway, improve control and increase loaded ride comfort.

What is a Timbren SES Kit?
A Timbren SES kit is a rubber bumper that will replace your stock jounce bumper. The Timbren bumper will sit 1.5” above your axle when unloaded; this is to ensure that your vehicles unloaded ride is not affected and that you will maintain your factory ride. Once your vehicle is loaded the SES will make contact with your axle, it will then expand and contract with the road providing the proper load support for the weight in your vehicle. This will keep your vehicle level, add stability, reduce sway and increase loaded ride comfort.

What are the differences between Timbrens and Air Bags?

Timbren:

  • Does not require air
  • Adjusts to load automatically
  • Zero maintenance
  • Does not make contact when unloaded

Air Bags:

  • Requires air to provide support
  • Allows for you to adjust to your liking
  • Needs to be kept at a minimum of 5 psi
  • Air can be added while unloaded to customize ride

What are the similarities between Timbrens and Air Bags?

  • imbren and Air Bags
  • Provides additional load leveling capacity
  • Levels rear of loaded vehicle with front
  • Reduces sag and sway
  • Improves loaded ride
  • Does not affect unloaded ride quality
  • Easy to install
  • Great customer service
  • Limited Lifetime Warranty

Which is better?
Both the Timbren Suspension Enhancement System and Air Bag Helper Springs are great products. Which is better would come down to user preference. If you are looking for full control over the product and the adjustability factor than Air Bags are the one to choose. If you want something that is lower maintenance and has that set it and forget it benefit than Timbrens will be the winner. Whichever product you decide to go with will be a great choice. Both will add additional load support, protect your current springs and improve loaded ride comfort.

Posted on

Identifying a Firestone Air Ride Spring, Air Spring Tips

identify-air-spring-1
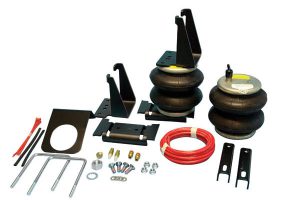
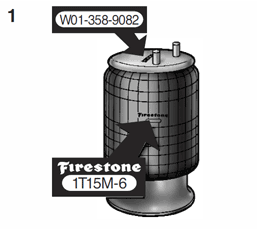
Read AON and bellows number
The first step to identifying an heavy duty air spring is to read the assembly order number on the label adhered to the bead plate (one of the components of an air spring, i.e., W01-358-9082). If the number is illegible, read the bellows number which is normally molded directly underneath the Firestone logo. A style number such as 1T15M-6 or 22 would tell exactly which bellows is needed and one could skip steps 2 and 3. If the bellows number is illegible, then determine whether it is a convoluted style or a 1T style by comparing it to the pictures in this guide. Proceed to step 2 if 1T style or step 3 if convoluted.


1T Style Air Springsidentify-air-spring-2

Measure the bead plate diameter and molded (uninflated) diameter of the rubber bellows and compare this with the 1T styles in the bellows index until a match is found (please note that the molded diameter can grow slightly with years of service). Then measure from the bottom of the piston to the top of the bead plate while the part is uninflated and extended. Next, find this same or similar measurement in the specific bellows section that was previously determined. When this has been done, skip to step


identify-air-spring-34.Convoluted Style Air Springs
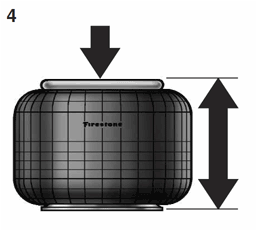
First determine whether it is a single, double, or triple convoluted style by comparing it to the pictures in this guide. Then measure the bead plate diameter and the diameter of the bellows (uninflated) across its widest area andcompare these dimensions with those given in the bellows index. Once a match has been made, proceed to step


identify-air-spring-44.Rubber Bumper

Many Airide™ springs include a rubber bumper inside the spring. To determine if one is present, compress the spring to its minimum height and measure from the bottom plate or piston to the top of the bead plate. Compare this compressed height with the pictures in the appropriate bellows section that was determined in step 2 (1T style) or step 3 (convoluted style). Proceed to step 5 if you have a 1T style spring or step 6 if you have a convoluted spring.


identify-air-spring-5
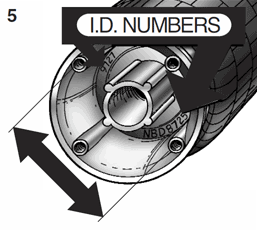
1T Style Bead Plates

The same bellows is used with many different combinations of bead plates and pistons, so be sure to check closely. Compare the bead plate and piston with the pictures from the “Cross Section View”, “Bead Plate Top View” and “Piston Bottom View” columns from the appropriate bellows section that was previously determined. Also, verify that the alignment (bead plate mounting in reference to piston mounting holes) is correct. In addition, the piston can be further verified by reading the identification numbers inside the piston and comparing these with those shown in the “Piston Bottom View” or piston index. Once a match has been determined, the corresponding assembly order number (i.e. W01-358-9082) can be used to order the part.


identify-air-spring-6
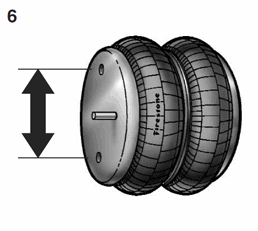
Convoluted Style Bead Plates

The same bellows is used with many different combinations of bead plates. Compare these bead plates with those diagrammed in this guide under the “Bead Plate Top View” and “Bead Plate Bottom View” columns for the specific style convoluted part that was previously determined and find the unit with the identical hardware, measurements and alignment (top bead plate mounting in reference to lower bead plate mounting). Once a match has been determined, the corresponding assembly order number (e.g., W01-358-7135) can be used to order the part.

Posted on

Airide Firestone air spring components

1. Studair-spring-components

A permanent part of the bead plate assembly used to attach the airspring to the suspension.
2. Combo Stud
Combination mounting stud and air fitting.
3. Blind Nut
A permanent part of the bead plate assembly providing an alternate mounting system to the stud.
4. Air Fitting Hole

A tapped hole usually 1/4″ N.P.T. providing air entrance for the part.
5. Bead Plate

Permanently crimped onto the bellows at the factory allowing complete part leak testing prior to shipment.
6. Bellows
The heart of an Airide spring. Includes at least four plies, or layers, of material–an inner layer, two plies of cord-reinforced fabric, and an outer layer.
7. Bumper (Optional)

A solid molded rubber fail-safe device used on many suspension applications. Prevents excessive damage to vehicle and suspension in the case of sudden air pressure loss.
8. Piston
The lower section of the 1T and 1X style of airspring made from aluminum, steel or fiber reinforced plastic. Provides lower mounting arrangement for the airspring in the form of tapped holes or studs.
9. Piston Bolt

Attaches the piston to the bellows assembly. Extended, in some cases, to serve as a means of attaching the spring to the suspension.
10. Girdle Hoop

A ring between the convolutions of the convolutedtype air spring.
Service Assembly
On Firestone Airide springs of the 1T style, the rubber bellows bead plate portion of the spring is a separate hermetically sealed unit, available for replacement use without the piston. Called a “service assembly,” it includes a bead plate, bellows, internal bumper (if any), and all attaching hardware.

Now that you know the parts and components of an air spring, here are some tips on how to identify an air spring

Posted on

Air Compressor Troubleshooting

Air Compressor Troubleshooting

Compressors that are passing excessive oil as evidenced by the presence of oil at valve exhaust ports or seeping from air inlets is usually a result of:

  1. Restricted air intake – Check the compressor air filter and replace as necessary. Check the compressor air intake hose for kinks, excessive bends, and a minimum ID of 5/8″.
  2. Restricted oil return – Do not use sealers on mounting gaskets as this could result in diminished oil return on some compressors. Check the bottom oil drain line on compressors that use this feature to ensure that there are no bends where oil could pool and that the minimum ID is 1/2″.

Causes of slow air pressure build times are:

  1. Dirty intake filter or restricted intake line
  2. Restricted discharge line or compressor discharge cavity
  3. improperly functioning unloaders or governor

Common causes of high head pressure and resulting failure are:

  1. Discharge line is kinked or clogged with carbon
  2. Water traps in discharge line causing line freeze-up
  3. Discharge line smaller than the minimum recommended 1/2″ ID
Posted on

D-2 Air Governor

D-2 Air Governor

Never condemn or adjust the governor pressure settings unless you have checked pressure with an accurate test gauge or a dash gauge that is registering accurately. Standard dash gauges are only required to be accurate to within +/- 10 percent.

d-2-style-air-compressor-governor

Remember the following if adjustment is necessary:

  1. Turn the adjusting screw counter-clockwise to lower the air pressure setting.
  2. Turn the addjusting screw clockwise to increase the air pressure setting.
  3. Be careful not to overadjust. Each quarter turn of the adjusting screw raises or lowers the pressure setting approximately 4 psi.
  4. The cut-in and cut-out range is not adjustable.

The most common cause of governor failure is contamination. Blow out all attaching lines, hoses, etc when replacing a governor. Make sure the reservoir pressure sensing line is routed from the reservoir so that no contamination may enter the line and pass into the governor. A replacement D-2 air governor can be found here.

Posted on

General Air System Valve Troubleshooting

Valve leakage is commonly caused by, but not restricted to:

  1. Contamination caused wear, damage, or sticking of the valve’s operating parts
  2. Application of air pressure to a valve’s delivery port from another device in the air system

Determine the port(s) improperly emitting air pressure and perform the following service checks:

  1. Exhaust port leakage at rest – Disconnect the delivery lines. If the leak stops, inspect the device at the other end of the delivery line for leakage. If the leakage continues, inspect and repair or replace the leaking valve.
  2. Delivery port leakage at rest – Consult the appropriate service manual for specific test procedures.
  3. Exhaust port leakage during application – Consult the appropriate service manual for valve specific test procedures.

Always blow out all attaching lines and reservoirs when installing a replacement valve to purge any contamination from the system. Avoid using thread sealant or tape as excess material can itself contaminate the air device.

Posted on

Air Valve Part Number References

There is no application guide that tells us what air brake valves the manufacturer used on your truck or trailer. The only people who can tell you what valve the vehicle manufacturer used based on a VIN are the vehicle dealers. With that said, there are other ways to determine which valve you need. You may find a label or a metal tag on the valve that has the OEM part number printed on it. Sometimes, the number is stamped right on the valve body. Raised casting numbers are usually no help at all. You’re looking for stamped numbers here.

If you can’t find any numbers, you can look for a match based on the pictures we provide here on AnythingTruck.com. This is easiest if you know at least what type of valve you’re working with. Is it a relay valve or push-pull valve? If you have no idea what kind of brake valve you’re replacing, you will probably benefit from looking over the Bendix Air Brake Handbook.

We try to provide a comprehensive cross reference lists for each air brake valve we offer here, but there are always OE numbers we haven’t learned about yet. The list of pages below contains useful part number references from OE valve manufacturers. You can try your part number at the sites listed or just give us a call or drop us an email for help.

  • Bendix Part Number Search Use this if you have a Bendix part number and want to find their current number.
  • Bendix Cross Reference Cross reference a vehicle manufacturer’s part number to a Bendix number.
  • Haldex Cross Reference If Haldex made it, they should be able to cross reference for your number to the current number. Look at the right side of the page for the cross reference search box.
  • Meritor Parts Online Use the search box at the top of the page.
Posted on

How Spring Brakes Function ?

The spring brake assembly is bolted to a mounting bracket on the axle. The spring brake pushrod clevis is attached to a slack adjuster which is attached to a camshaft. As the spring brake pushrod is extended from the chamber, either by the parking/emergency brake or by service air pressure, the linear force of the pushrod is converted to rotational force by the slack adjuster and camshaft. This spreads the brake shoes against the brake drum.

When air is applied to the parking/emergency brake, the load of the heavy spring is released allowing the wheels to turn. When the driver steps on the brake pedal, a signal is sent to a relay valve that then sends air pressure to the service chamber of the spring brake. The air pressure causes the pushrod to extend which in turn applies the brake. This air pressure is released once the driver takes his or her foot off of the brake pedal.

The spring brake is designed to apply the the brakes automatically in the event that there is a loss of system air pressure. This happens because the air pressure holding back the heavy parking/emergency spring disipates allowing the spring to extend the pushrod which in turn applies the brake.

Posted on

What is difference between Spring Brake Actuator and Brake Chamber?

Brake chamber and spring brake actuators are used in Air braking system. mostly in heavy vehicles (Trucks).

Brake chambers are used in Front axles and spring brake actuators in Rear axles.

The main difference between Spring brake actuator and brake chamber is, Brake chamber doesn’t have hand-brake function but Spring brake actuator does have hand-brake function.

Brake chamber:
Brake-chamber
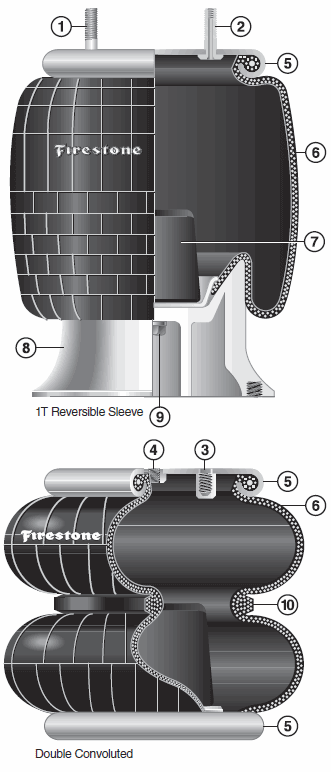
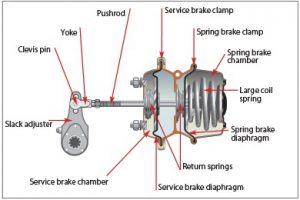
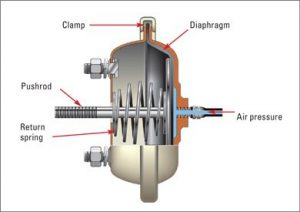
It has only one function, whenever air enters into the chamber, diaphragm  gets expand and pushes the pushrod then the push rod pushes the slack adjuster then slack adjuster rotates the S-cam shaft and so on. when driver releases the brake pedal the return spring push back the diaphragm to its original position

Spring brake actuator:

 Brake-chamber-1

See that GIF pic (donno GIF works on all devices), The red color one is second chamber , and blue one is normal brake first chamber. there is separation between those two chambers and there are different diaphragms for each chamber. (Refer the image)

First chamber/service brake chamber (Blue color) : when driver applies the brake , pressurised air enters into first chamber(See that blue colour), diaphragm expands and the diaphragm  pushes the pushrod hence brakes applied. (Just like brake chamber working)

second chamber/Spring brake chamber (Red color): in this chamber pressurised air is available all the time, this pressurized air holding back the Large coil springs  not to expand which connected to pushrod . so whenever driver applies the HandBrake the pressurized air which was holding the springs in second chamber gets released into atmosphere hence the large coil springs get expanded and pushes the Pushrod.

Posted on

Ordering a Meritor WABCO System Saver Twin air dryer

Meritor WABCO System Saver Twin Air Dryers

System Saver Twin air dryers are designed for trucks with high air use requirements. One cartridge is drying air while the other is regenerating. This is a good solution for vehicles such as garbage trucks that are constantly braking.

650-sstwin

Ordering a Meritor WABCO System Saver Twin air dryer

We sell all System Saver Twin dryers as non-returnable special orders. We’ll need a part number from your existing air dryer. You can find it on the metal ID tag, and it will look like 432 431 016 0. For new installations, you will need to determine the compressor’s rating in CFM and whether you need a 12-volt or 24-volt heater/thermostat.

System Saver Twin Repair Parts

Most repair parts can be special ordered for the System Saver Twin. Download the parts list/troubleshooting document from the link above. Call or email when you’ve determined which parts you need, and we will get you the current price and availability of those items.

Other size: